 Protocol
Author
Rosemary White
Overview
This protocol outlines how to section frozen plant tissue using a cryostat.
This is one of a series of protocols on sectioning unembedded plant tissues, prepared by Rosemary White.
Linked Protocols
Making hand sections without support material
Using other plant tissues as support tissue to make hand sections
Using support tissue in a hand microtome to make hand sections
Sliding or sledge microtome sectioning of fresh or fixed tissues
Vibrating microtome sectioning of fresh or fixed tissues
Background
You can cryo-section fresh or fixed tissues, and tissues are either frozen before placing in embedding compound on the cryostat stub, or are frozen after placing in embedding medium on the stub, which is the more common method. For the latter method, fixed tissues are either rinsed in buffer or water and frozen directly, or they are infiltrated with up to 15% sucrose, and/or coated in molten agar, then frozen on the stub. The sucrose acts as a cryoprotectant to prevent ice crystal damage to subcellular structures, and is only needed if you need to see this level of detail.
Note that the following set of instructions is somewhat specific for this particular instrument. Modern instruments will come with a full set of detailed instructions that should be followed where they differ from those below.
Materials/Equipment
- TissueTek or other embedding compound (viscous liquid or gel)
- fine and coarse paintbrushes to brush debris off blade and frozen tissue – these go into the cryostat before a run and stay cold
- Sharp razor blades
- single-edged for trimming frozen material on stubs
- single-edged disposable carbon steel for sectioning
- reasonably fine forceps – at least one pair should be in the cryostat
- sticky slides – superfrost or polylysine-coated slides
- container to collect slides with still-wet sections
- large petri dish or other to cover sections while drying – to keep off dust
Units, terms, definitions
Procedure
Getting started
- The cryostat is always on (image at right); before starting, check that the temperature is correct for your tissues.

- When you are ready to section your frozen tissue, make sure you have the complete cryostat toolkit containing forceps, razor blades, sticky slides, small paint brushes, cryostat blades, water bottle, coverslips and TissueTek. Also have on hand a small dewar with liquid nitrogen if you need to freeze tissue onto a stub outside the cryostat (step 4.)Preparing to section
- Turn on the light in the chamber.
- You now need to attach your frozen tissue to one of the cryostat stubs using TissueTek or Cryogel. This can be a messy job. Try not to drop TissueTek all over the place, and note that it’s easiest to clean out of the cryostat while still frozen.Put a dob of TissueTek or Cryogel on a stub, outside the cryostat chamber. The cryostat stubs used for our instrument can be seen at left below.

- Jam your frozen tissue quickly into the medium, and arrange in the best orientation for sectioning. Freeze the tissue onto the stub by plunging into liquid nitrogen or placing into the -20∘C freezer. Do not freeze too cold, or the medium will shrink too much and fall off the stub.
Add more medium around the tissue so it is well-supported for sectioning and re-freeze. - Now place the stub in the chuck. Slide the chamber lid open.
The anti-roll plate will probably be in place as shown above. Fold it back, and use the large specimen advance wheel to position the chuck above the knife holder as shown above.

If the chuck is very close to the knife holder, retract it by pressing the rapid retract button to the left, outside the chamber – one of the top buttons shown at right. The top button retracts the chuck fully, the next one retracts it as long as you press the button. The other two buttons advance the chuck towards the knife.
Now place the stub plus tissue into the chuck. The stub is held in place by tightening the black tightening screw sticking out to the left. Position the stub so the specimen is in the desired orientation for sectioning. - There will probably be a cryostat blade in the knifeholder, as shown below – it can be used for trimming the frozen block until you reach the tissue.
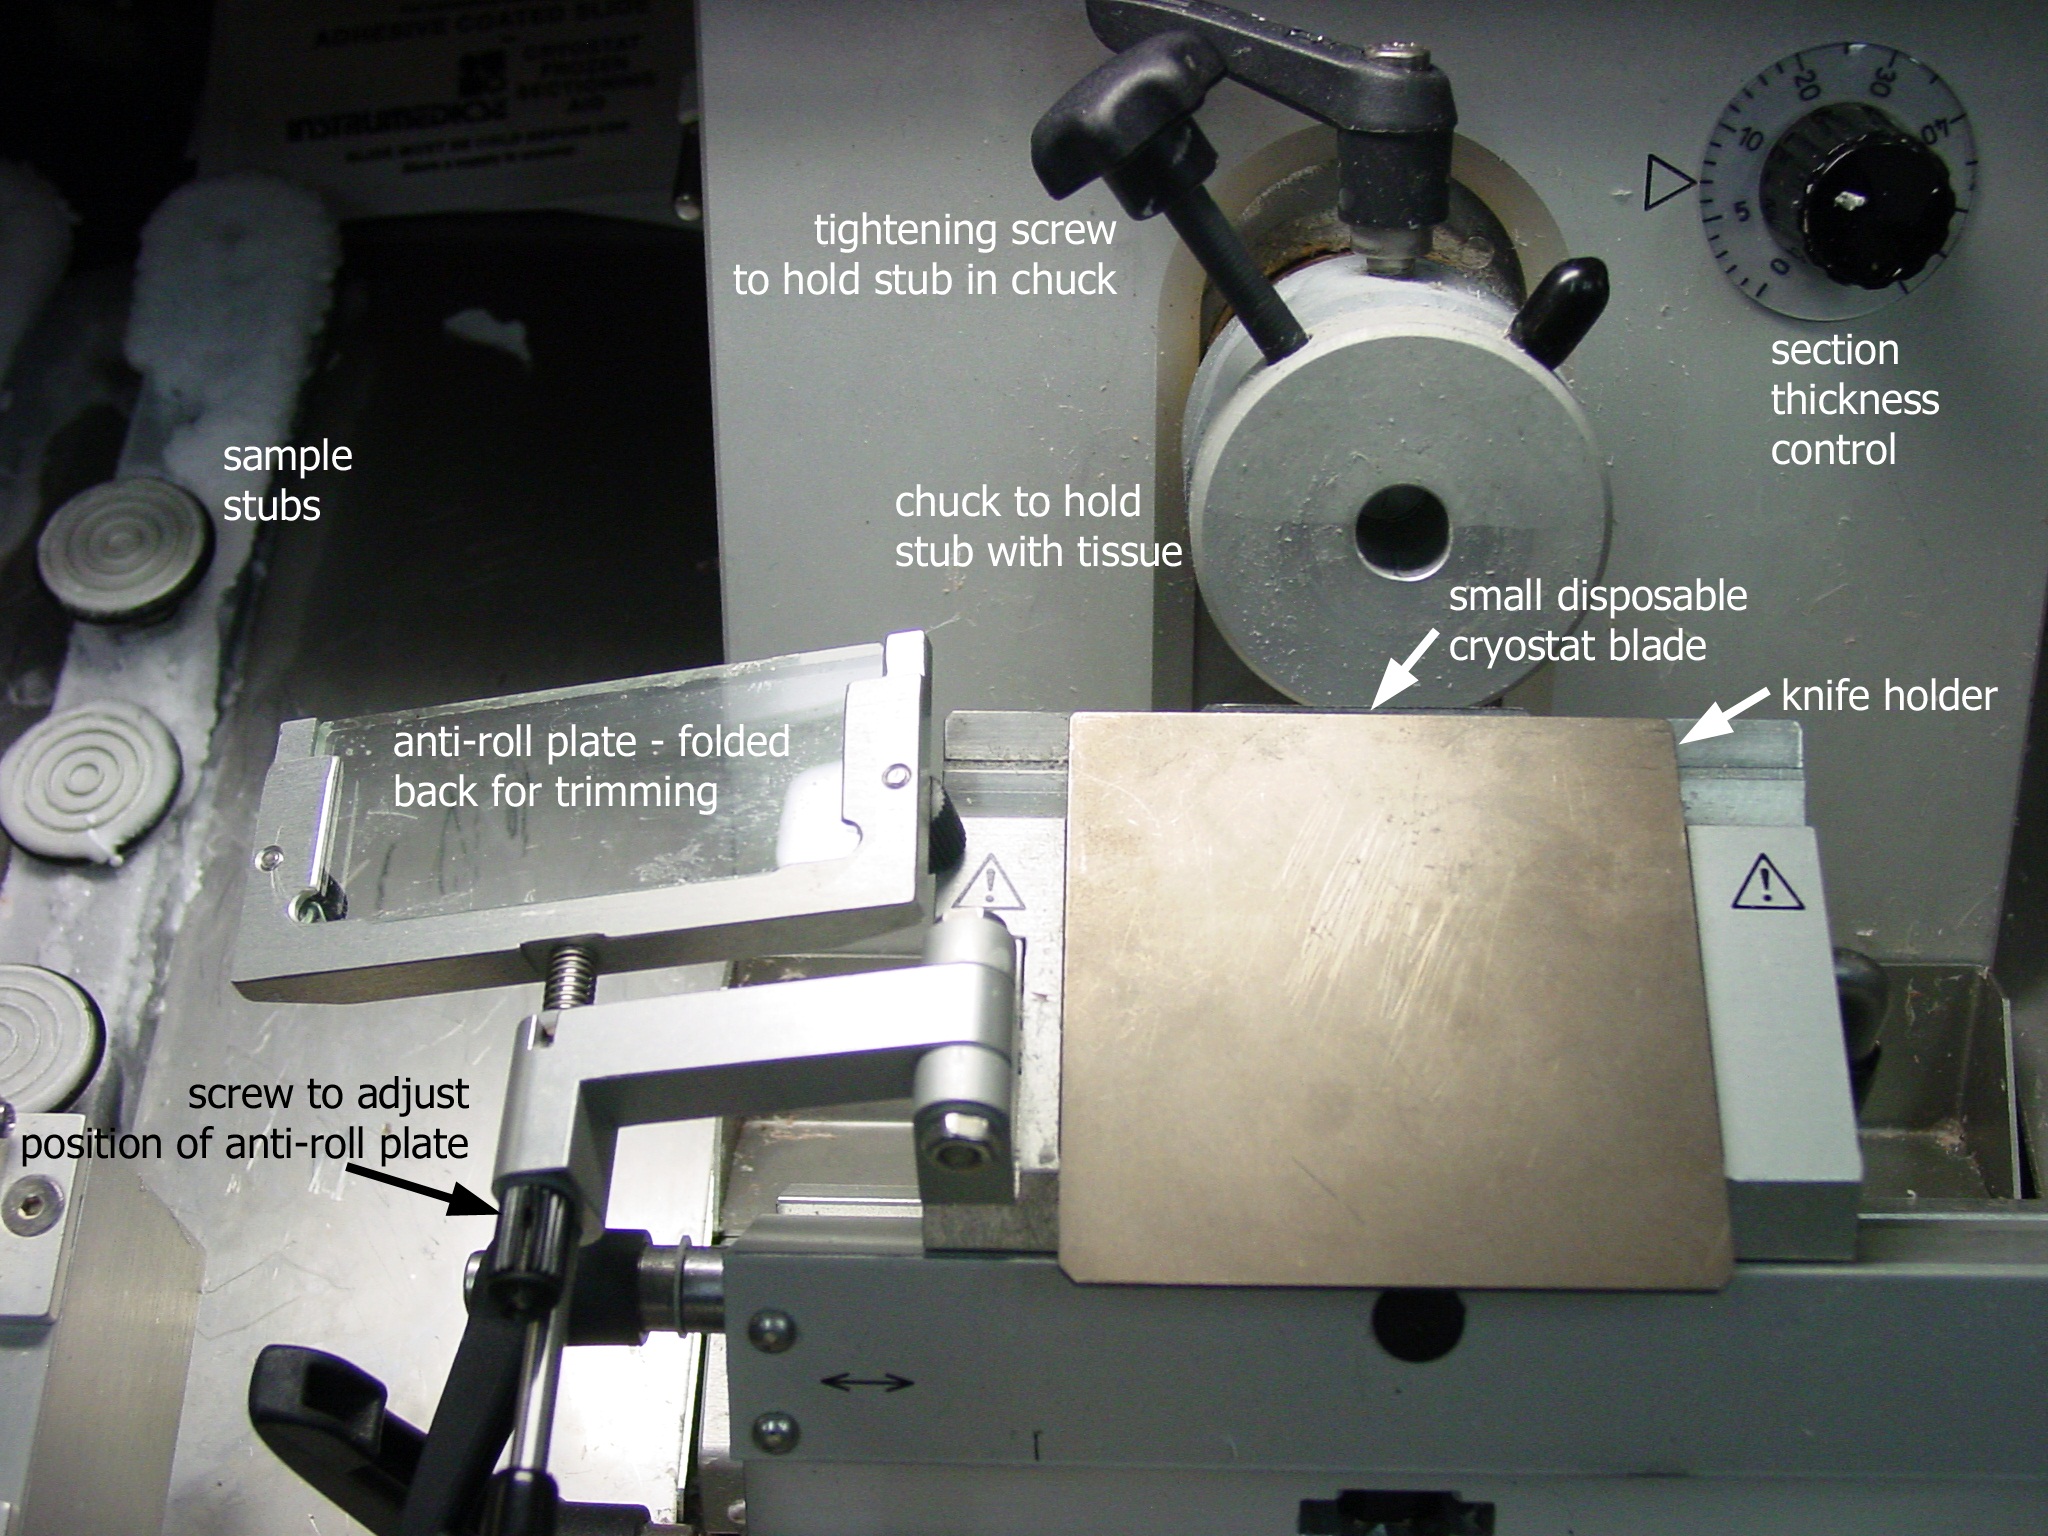
- Once the stub is in the holder and oriented, fold back the anti-roll plate for trimming. Set the section thickness to at least 20-30 μm. Close the chamber lid.
- Bring the knife close to the specimen by pressing the rapid advance buttons outside the chamber.
Use the advance handle (wheel on right hand side of cryostat) to raise and lower the specimen as you are positioning the knife close to it.Sectioning and collecting sections

- Rotating the advance handle (on right hand side of machine) clockwise will move the tissue up and down past the knife. If the tissue is close enough, a section of tissue will be cut and stay on the knife edge. The chuck will also bring the tissue closer to the knife ready for the next section. Keep the anti-roll bar folded back, and sweep away trimmings until you are ready to collect sections.
The maximum automatic advance is 80 μm – set the advance mechanism to the desired section thickness using dial in front of the knife.
For many plant tissues, especially if not infiltrated in cryoprotectant, thicker sections are better. Softer tissues can be sectioned much more thinly – down to a few micrometers.
When you are ready to collect sections, you will need to either move the knife so a fresh zone will cut the tissue, or replace the knife with a new one. For good sections, a sharp knife is essential. Discard blades as soon as they are blunt – they are much cheaper than your precious samples! Follow the specific instrument instructions for knife exchange.
Always close the chamber lid except when you need to reach in to make adjustments or change samples. Sectioning proceeds much more smoothly when the cryostat is not struggling to maintain temperature with the lid open. Keeping the lid closed also prevents buildup of frost inside the chamber and on your sample. - When you are ready to collect sections, you need to fold the anti-roll bar in place so it is resting on top of the knife edge.
Now, when you rotate the advance handle, the section should slide under the glass shield and stay flat rather than rolling up. If the section does not do this, use the screw at the back of the anti-roll plate to move it incrementally forwards or backwards until you get good sections. The position of the anti-roll plate is absolutely critical to collecting good, flat sections. - Only cut one section at a time.
To collect the sections, lower a sticky slide, sticky side down, onto the section. When the slide gets near the section it will start to melt onto the slide, at which time you can raise the slide and the section should come with it.
Depending on how you want to process the section, either air-dry onto the sticky slide, protecting from dust under a large petri dish, or allow to dry off slightly, mount in mounting medium (e.g. water) and cover with a coverslip. - Once you have finished sectioning, remove specimens from stubs and clean stubs, and place stubs back into machine.
Wipe out any residue left in the machine during sectioning. The chamber must be left as clean as possible for the next user.


Literature references
Teaching Plant Anatomy (2008) by RL Peterson, CA Peterson and LH Melville, NRC Press, Ottawa, Canada ISBN 978-0-660-19798-2
- This book is all about hand sectioning a wide range of tissues and observing either unstained or stained. It also has a CD with it.
Health, safety & hazardous waste disposal considerations
- Read the manufacturers’ instructions for working with your cryostat.
- Take extreme care when working closely with knives or sharp serration edges of the cryostat.
- Avoid direct skin exposure to frozen tissues and frozen equipment, use protective gloves when handling.
- Follow the specific instrument instructions for knife exchange.
- Always close the chamber lid except when you need to reach in to make adjustments or change samples.