 Protocol
Author
Rosemary White
Overview
This protocol outlines how to create hand sections from leaf and root tissues using basic materials and tools in the lab. Many, if not most fresh plant tissues can be hand sectioned in this way. Particularly good materials are fleshy stems, leaves and roots which are easy to hold while sectioning. Even fairly hard material can be sectioned – here, the aim is to collect a small piece of the hard tissue which has been sectioned thinly enough to obtain useful anatomical information. Otherwise, for very soft tissue, use support material around the tissue, or for very hard tissue, use a type of microtome – sledge, vibrating microtome or cryostat.
Background
This is one of a series of protocols on sectioning unembedded plant tissues, prepared by Rosemary White.
Linked Protocols
Using other plant tissues as support tissue to make hand sections
Using support tissue in a hand microtome to make hand sections
Sliding or sledge microtome sectioning of fresh or fixed tissues
Vibrating microtome sectioning of fresh or fixed tissues
Cryostat sectioning of frozen tissues
Materials/Equipment
- piece of pink dental wax
- water – conical flask with plastic pipette, not a wash bottle – plastic pipettes come in a wide range of volumes and tip sizes and are safer than glass pipettes
- watch glasses, spot plates, or small glass petri dishes with water to put sections in
- double-edged razor blades – lots – break in half while in their wax paper wrapping – use lots, stop using a blade as soon as you feel any resistance to cutting the tissue
- reasonably fine forceps
- fine paintbrush and/or sharpened orange sticks to transfer sections
- slides
- cover slips
- dissecting microscope – doesn’t have to be a fancy one
- some detergent – 1% Tween-20 or Triton-X-100 – use this if your leaf or other tissue is very hydrophobic (e.g. rice), it will help to cover the tissue with water so you don’t get air bubbles between tissue and coverslip or slide, although it may damage membranes if you plan to stain the living tissues with membrane stains or live/dead stains or look at chloroplast or other autofluorescence
 Hand sectioning materials displayed on bench
Procedure
Leaf tissue:
- Using a sharp razor blade, cut a piece of leaf about 5-10 mm wide and as long as you like. In the example below, a strip was cut that extends from the midrib of the leaf to the edge, but you could also cut along one side of the leaf from tip to base. Include the midrib if desired. Two strips have been cut from the cotton leaf below:

- Put a drop of water on the pink dental wax over the end of the leaf strip that you want to start cutting sections from.
- Then cut very fine slices of leaf into the drop of water, holding the leaf down with your left forefinger (if you’re right-handed) and cutting each slice with a single cut of the blade from top to bottom. To get really thin slices, do this cutting on the dissecting microscope, carefully placing the razor blade to get the thinnest sections. Rest the flat of the blade against your non-cutting forefinger (taking care not to cut yourself!).
- Transfer the sections with forceps, or with the tip of a paintbrush (with few bristles – pull or cut the rest out), from the dental wax into water in a watchglass, or into water in one section of the watch glass. If you use a transparent watchglass, it’s easier to pick the thinnest sections later on. Accumulate sections there – cut LOTS of sections.
- Look at the sections under the dissecting microscope to select the very thinnest, they will be almost transparent. This is easy if you place the transparent watchglass onto black paper or other black background. Transfer some of these very thin sections to a SMALL drop of water on a microscope slide.
- Cover with a coverslip – put one edge of the coverslip into one edge of the drop of water and lower the coverslip slowly with the forceps. If you drop the coverslip onto the sections you are likely to get air bubbles. If the water doesn’t extend to the edges of the coverslip, add a SMALL amount of water – don’t flood the sections or they will float around.
- Observe on dissecting or compound microscope. If you need to add more contrast to the sections – more than you can get by closing down the iris diaphragm on the microscope, you can stain your sections. See separate instructions about staining (still to come).
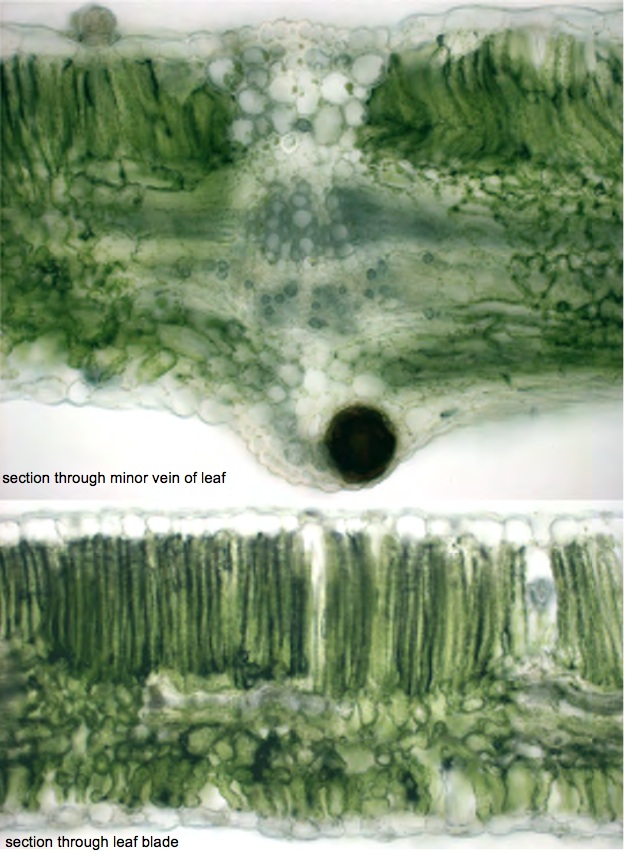
- Example of hand sections of cotton leaves (unstained):
Palisade mesophyll – long thin cells in upper half of leaf
Spongy mesophyll – smaller less regular cells in lower half of leaf
The mesophyll tissue has abundant green chloroplasts, very few chloroplasts in epidermis, few in cells around the veins
Top image is through a large leaf vein, dark spot is a gossypol gland. Bottom image is a section through a leaf blade
- Can test chloroplast intactness/chlorophyll abundance in a qualitative way by checking the red fluorescence under blue light on a fluorescence microscope.
Root tissue
Sectioning reasonably large diameter roots, like maize roots, or old lucerne or canola roots, is similar. Fine roots can be sectioned this way as well, as long as you are careful not to squash the roots as you are holding them down with your finger and if you do the sectioning under the dissector to control section thickness. Try the following:
- Place the root to be sectioned in a small drop of water on the pink dental wax. Get your fingers and the half-razor blade wet, everything should be wet.
- Cut very fine slices of root into the drop of water, holding the root down GENTLY with your left forefinger (if you’re right-handed) and cutting each slice with a single cut of the blade from top to bottom – NO SAWING. It’s most important to cut through the tissue with a single, even stroke of the razor blade.
To get really thin slices, watch your cutting on the dissecting microscope, carefully placing the razor blade to get the thinnest sections. Rest the flat of the blade against your non-cutting forefinger (taking care not to cut yourself!).
Discard the blade as soon as you feel resistance to cutting, or if the tissue starts to tear during cutting. Don’t waste time and tissue conserving razor blades.
Continue as described in steps 4. – 7. above to select which sections to look at.
Other plant tissues
This simple technique can be adapted for small and large, soft or hard tissues, it just takes practise and sharp razor blades. With large tissues, for example, stem tissues, you don’t necessarily need to have a complete section of the tissue to obtain the information you need, a partial section may be sufficient.
Other types of sections
The sections described here are cross sections, longitudinal sections are somewhat trickier to obtain, especially of very narrow structures such as roots. It may be sufficient to cut these tissues in half and observe the cut surface. If this does not reveal the internal tissues of interest, it will need to be sectioned on a vibratome, see below. For greater detail of very small or deeply internal tissues, embedding and sectioning will be needed.
Another type of section is paradermal, parallel to the epidermis. This is useful in leaves, to observe stomata or palisade mesophyll cell arrangements. Such sections are very tricky to obtain by hand, but are possible with persistence and a bent single-edged blade.
Examples of hand-sectioned aerenchymous maize and rice roots. These are unstained sections, observed under brightfield with a compound microscope.


Literature references
Teaching Plant Anatomy (2008) by RL Peterson, CA Peterson and LH Melville, NRC Press, Ottawa, Canada ISBN 978-0-660-19798-2
- This book is all about hand sectioning a wide range of tissues and observing either unstained or stained. It also has a CD with it.
Health, safety & hazardous waste disposal considerations
- Take extreme care when using blades, especially when resting the blade against your non-cutting forefinger.