 Protocol
Authors
Scott Berry, Xavier Sirault
Overview
An infrared camera can be used to visualise’ surface temperature distribution of an object by focusing the long wave radiations emitted by the object onto a temperature-sensitive detector. A large factor influencing plant temperature is the water evaporating from the leaves, cooling them, as a result of having stomata open for gas exchange. As leaf temperature differences due to variation in transpiration rates can be visualised continuously and non-destructively by infra-red thermal imaging, this technology was used to screen genotypes for tolerance to the osmotic component of salinity in cereal crops. The level that plants cope with osmotic stresses is reflected in how well they continue to conduct water through their leaves, and so comparing temperature differences between genotypes under salt stress and those that are not may be indicative of their level of osmotic tolerance.
Background
When plants experience osmotic stresses such as those caused by drought or saline conditions, mechanisms employed by the plants help reduce these damaging effects to allow the plant to grow as normally as possible. For example a plant responding to low water availability may close the stomata on its leaves to reduce transpiration, conserving the limited resource. However for photosynthesis to occur, carbon dioxide needs to be available to the Rubisco enzyme, and the closure of stomata causes carbon dioxide to also become a limiting resource (Figure below).

Materials/Equipment
- Bronze-coloured acrylic as a background (from PlastiX, Sydney)
- FLIR SC660 infrared camera
- Thiram 800 (fungicide)
- Firewire cable to connect camera to computer
- Tripod to mount the camera onto
- Computer with Firewire port and ThermaCam Researcher Professional software.
- Growth cabinet with temperature and relative humidity control (we used a Conviron PGC20 with CMP6050 Control System)
Units, terms, definitions
VPD, Vapour Pressure Deficit (kPa) See VpdL
Procedure
Growing the Plants
- Several varieties of wheat are chosen, seed is weighed and selected in an average weight range.
- Seeds are soaked in water for 2 hours then washed in Thiram 800 anti-fungal solution (1.4 g/L). Filter paper in Petri dishes is wetted with the Thiram solution, 2 filter papers are used on the bottom, seeds are oriented embryo side up (groove side down) and 1 more piece of filter paper is used on top of the seeds.
- Dishes are kept in the dark at room temperature for 48 hours then seeds are transferred to pots if germinated, again embryo side up. Some seed may require stratification to germinate, in which case all dishes should have an initial 24 hours of 4∘C cold treatment.
- Germinated seed are planted at 2 cm depth in pots of pre-wetted 50:50 sand-perlite mixture and placed into the growth cabinet, set as in step 1 of Setting Up.
- Control pots are watered with ¼ strength Hoagland’s solution, and Salt Treated pots have NaCl included in the Hoagland’s solution in increasing concentration steps of 25 mM. Calcium in the form of CaCl2 is included so that the Na:Ca ratio of the solution does not exceed 15:1. The final salt concentration is reached 48 hours before infrared images are taken. Watering begins no earlier than 48 hours after coleoptile emergence, with a maximum of one 25 mM NaCl step in the morning and another in the afternoon.
Setting Up
- The growth cabinet is set up to be a temperature and relative humidity to achieve a VPD of approximately 1.5 kPa. At this VPD there is a large transpiration rate from the leaves with the aim to make osmotic tolerance more pronounced, but not so high that the stomata close entirely because the leaves are drying too quickly. This value of 1.5 kPa has been found to be ideal for wheat but may be different for other plants.
- A dark coloured acrylic screen is placed onto a raised flat platform against the wall inside the growth cabinet. The acrylic has a higher emissivity value than the wheat, does not transpire and is darkly coloured so that its temperature appears several degrees warmer than the wheat. This is very important for distinguishing the plant and obtaining useful data.
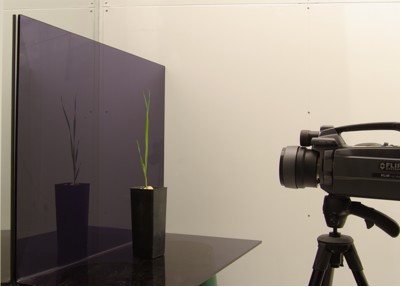
Fig 1. A single plant is placed in the centre of the SC660’s view for focusing purposes. A dark coloured acrylic background is used to help define the leaf borders in the images taken. - Two or three plants are placed next to the acrylic background, with a large enough gap between them so that their leaves do not obstruct each other from the camera’s view. The infrared camera is positioned on a tripod as close to the plants as possible without cutting out any of the plants from the image. The camera is adjusted so that no parts of the pot or any material other than the plants and the Perspex background can be seen, and the camera angle is roughly perpendicular to the plants.
- A bent piece of cardboard is placed over the top of the camera, but not obscuring the image, so that the growth cabinet lights do not heat the optics above the temperature of the surrounding air. All these materials are placed in the cabinet at least 30 minutes prior to data collection so that their temperatures have come to equilibrium.
- Power and Firewire cables are passed through a small port in the cabinet to power the camera and connect it to the computer while keeping the cabinet door shut.
- The camera is turned on and ThermaCam Researcher Professional is used to connect to the camera. Under the menu CameraSelect Camera… select SC640 (it works for SC660) and select Firewire. Select CameraShow Camera Image. Under ImageSettingsObject Parameters tab input the temperature and humidity conditions of the cabinet (including optics temperature) and the distance of the camera from the plants. The object parameters are not so important for this protocol because we are only interested in relative temperatures, but if data is to be used for any absolute temperatures in the future these values must be input correctly. The emissivity is usually set at 0.95 for wheat, but varies according to the plant type, and even different varieties.
- The floating ThermaCAM Firewire window can control various features of the camera. Under the Cam tab, the Measurement Range should be set to -40 to 120 ∘C NOF, and Auto shutter set to On else damage can result to the micro-bolometer. The focus can also be controlled here by pressing the = sign. A plant must be in the centre of the image for focusing purposes.

Fig 2. The Cam tab in the ThermaCAM Firewire window can control various features of the camera. Here the focus button has just been pressed to focus the camera on the plant which has been placed in the centre of the display. - The Rec tab contains features for saving images. Click the Conditions button to set how files are saved: Start and Stop should be set to Tool button/F5, Record set to -At highest speed’, and File Format to Images in one file. The Auto name base is the name with incrementing numbers following for each picture, and should be either be changed each time to match the variety in a screen, or remain constant and a record of which plants correspond to the numbers kept.

Fig 3. (A) The conditions button under the Rec tab of the ThermaCAM Firewire floating window is pressed to open the Recording Conditions window. (B) The Auto name base field describes how the files will be named each time the Save button is pressed, a sequential number following the name is added to the file at each picture save.
Taking pictures
- The pots are oriented so that leaves are not obstructed by others from the same plant or its neighbour, and the control pots are kept in the same position for each picture. At least one control plant needs to be in each picture to contrast with the salt treated plant. Whenever the cabinet door is opened to change the plants, you should hold your breath (see trouble shooting tips below) so that the carbon dioxide levels inside the cabinet do not increase. An increase in carbon dioxide availability will cause stomata to close, decreasing transpiration and therefore voiding the results. After moving the plants the initial air flow and shaking of the plant will briefly alter transpiration and therefore temperature of the plant, so wait for at least 30 seconds before taking a picture. If the cabinet is open for more than the few seconds required to change plants, then give a longer time for cabinet conditions to settle (see trouble shooting tips below).
- Press the Save button (the picture of the floppy disc, Fig 3) to save the image.
- Repeat the last two steps for all the plants.

Fig 4. A picture viewed in the ThermaCAM Researcher Professional software. The scale has been adjusted so that the background appears as white (this is for presentation purposes). The plants on the sides are controls but the centre has been watered with 100mM NaCl, and so is suffering osmotic stress and is warmer than the controls.
Image Analysis
This protocol covers the necessary steps to acquire images, details of analysis are not covered here however an example is given:
Statistical software such as Matlab with the Image Analysis Toolbox is used to create a script which does the following: opens each image file, normalises and scales the infrared data, distinguishes what is plant and what is background, takes an average temperature for each plant and then compares the plants’ temperatures.(M-code is available on demand by e-mailing Xavier.sirault@csiro.au).
Notes and troubleshooting tips
Important tips when opening growth cabinets
If you are experiencing difficulties holding your breath while moving pots around in the cabinet you can construct a breathing apparatus like one of our colleagues did, consisting of a facemask and a breathing tube which attaches to the facemask and leads out and away from the growth cabinet. Carbon dioxide will change how plants transpire; affecting the temperature of the leaves which is what we are trying to measure, so care must be taken to avoid increasing carbon dioxide in the cabinets.
When opening growth cabinets the surrounding air will be let in, it is important that sufficient time is given to let cabinet conditions return before taking measurements. Arrange pots close to the platform so that minimal time is needed to swap the pots. I tend to have the cabinet open long enough to move a large group of pots near the platform and arrange them in sequence, wait two or three minutes for conditions to settle, then spend only 30 seconds between sets of pots because the cabinet door is only open for around 6 seconds to make these minor adjustments.
Growing Media
The choice of growing media should be selected to have a minimal nutrients present and low water retention, so that salts can be easily flushed out and increased with confidence. We chose a 50:50 sand perlite mixture. This very loose material may fall out of the base of the pot, so we used fly-wire cut to the shape of the pots’ bases to prevent leakage.
Links to resources and suppliers
FLIR – www.flir.com
Acrylic from PlastiX www.plastix.com.au
Matlab – www.mathworks.com
Literature references
Xavier R.R. Sirault, Richard A. James and Robert T. Furbank (2009) A new screening method for osmotic component of salinity tolerance in cereals using infrared thermography. Functional Plant Biology 36: 970-977
Health, safety & hazardous waste disposal considerations
Growth cabinets tend to be a lot brighter than the room they are in. It is advisable to wear eye protection, especially when looking in and out of cabinets frequently.